A well-leveled Bermuda grass lawn not only enhances curb appeal but also promotes healthier growth. Achieving this requires an understanding of the best timing, materials, and preparation methods.

When to Level Your Lawn
The timing of your leveling project is crucial for the health and recovery of your Bermuda grass lawn. The ideal period for this task is during the peak growing season when the grass is in its most vigorous state of growth. This typically occurs in the warm summer months, specifically July for many readers, although specific timing may vary depending on your local climate. Leveling outside of this period, particularly in the cooler months of spring, winter, or fall, can significantly impede the lawn’s ability to recover. Grass growth slows down in cooler temperatures, which means any disturbances caused by leveling will take much longer to heal, potentially leaving your lawn looking bare and uneven for weeks.
Here’s what happens when you sand level too early in the season. This lawn was leveled in March, likely due to beginner impatience. The photos were taken mid May, meaning the lawn was given two months to recover and still hasn’t full recovered. If leveling was done in June, it’d recover much faster. Suffocating grass when it’s coming out of dormancy is not a good idea and these photos are a testament to that.

Choosing the Right Material
The success of your leveling project largely depends on the material used. Masonry sand is widely recommended for leveling Bermuda grass lawns due to its optimal texture and drainage properties. Unlike heavier soils that can compact and stifle grass growth, sand provides a light, aerated medium that encourages the roots to spread and the grass to thrive. It’s a common misconception, especially among those from cooler, northern climates, that sand is an unsuitable medium for grass. However, Bermuda grass, in particular, benefits from sand’s ability to improve drainage and alleviate soil compaction, making it the ideal choice for leveling projects.
Think about the last time you were on a golf course with a golf cart. Did your cart have a divot filler bottle? Often times golf carts come with divot filler and in that is exactly what that golf course thinks is best to level the low spot you just created. In a cool season course, you might find a fill that contains seed. In courses that use Bermuda grass, you’ll find a sand mixed with fertilizer. You won’t find top soil and you won’t find compost in that mix.
In a Bermuda grass lawn, there is no reason to ever level with top soil or compost. If your soil has little organic material, you can amend soil to change its texture and structure, but that’s different than leveling. The idea of leveling with top soil comes from people who grew up in the north (cool season grasses) and don’t realize it’s different in warm season lawns. They spread misinformation and that’s how folks get confused.
Here’s why you don’t use compost or top soil:
Material Quantity
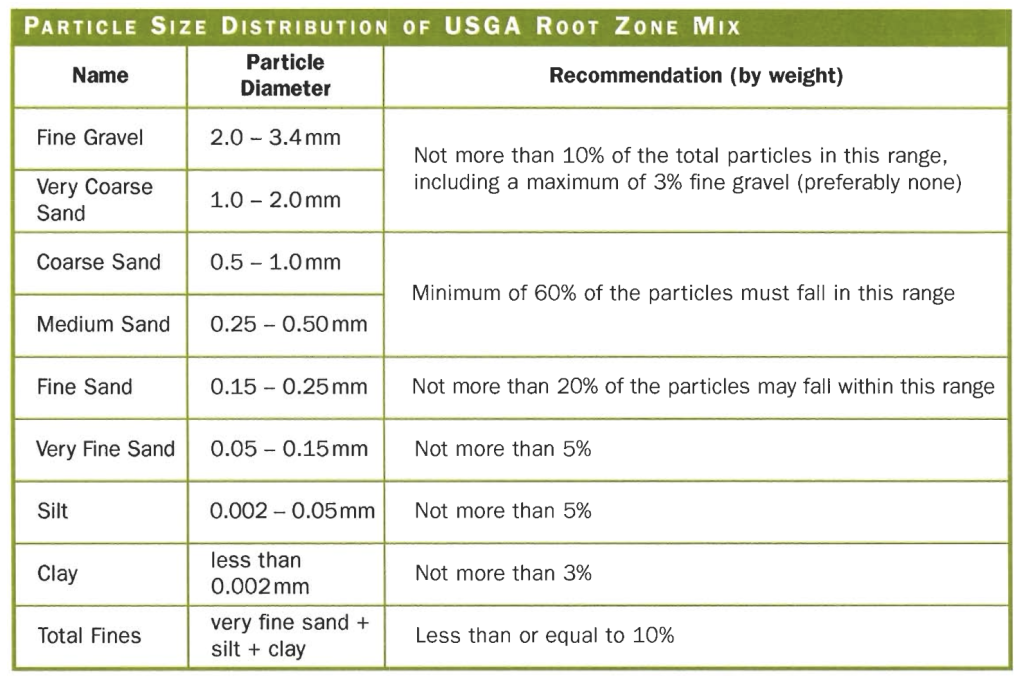
Determining the right amount of sand to use is critical to avoid suffocating your lawn. As a general rule, aim to correct any uneven spots with no more than a 1/2-inch layer of sand. This ensures that the grass can easily grow through the leveling layer without being overwhelmed. For practical application, a quarter-inch layer of sand spread across a 4,000 square foot lawn would require approximately 3 cubic yards of sand. If you’re aiming for a half-inch depth, you would need to double this amount. However, it would be wise to avoid applying more than 1 cubic yards of sand per 1,000 square feet of lawn to ensure the grass can recover effectively and continue healthy growth. Moderation is key; it’s better to undertake multiple, lighter leveling sessions throughout the growing season than to apply too much material at once. Applying more than 1 inch in any area will suffocate the lawn and lead to a slow recovery.
| Depth (inches) | Cubic yards per 1000 sqft |
| 1/4 | 0.77 |
| 1/2 | 1.54 |
| 3/4 | 2.31 |
| 1 | 3.08 |
Preparation Steps
Before you start spreading sand across your lawn, adequate preparation is essential to ensure the success of your leveling project. First, mow your Bermuda grass as short as possible. If you own a reel mower, this task will be straightforward; otherwise, set your rotary mower to its lowest setting. The goal is to minimize the grass length so the sand can easily reach the soil, allowing the grass to grow through the new layer rather than being smothered by it. Following mowing, dethatching is an optional next step if you’re unable to scalp. Thatch is a layer of dead grass, roots, and debris that accumulates between the soil surface and the living grass blades. A thick layer of thatch can prevent sand from integrating with the soil, impeding water infiltration and nutrient absorption. Use a dethatching rake or a mechanical dethatcher to remove this layer, which will improve the effectiveness of the leveling process by ensuring direct contact between the sand and the soil.
Application Technique
Applying the sand evenly and effectively requires the right tools and technique. For small to medium-sized lawns, a leveling rake is invaluable (get one here). These rakes come in various sizes, and choosing one depends on the size of your lawn and the scope of your leveling project. While leveling rakes up to 36 inches can be found on online marketplaces like Amazon, those with larger lawns might benefit from wider rakes, such as 48″ or 52″, to cover more area more efficiently. If you’re dealing with a particularly large lawn, unconventional tools like a dragged chain-link fence or even a wooden pallet can be used to spread the sand more broadly. The key is to distribute the sand as evenly as possible, using the back of the rake or another flat tool to smooth it over the lawn. Aim for a uniform layer that fills in the dips without burying the grass. Patience and attention to detail here will pay off with a smoother, healthier lawn.
Aftercare
Once the sand is applied and leveled, the care you provide in the following weeks is crucial for the recovery and continued health of your Bermuda grass lawn. Immediately after leveling, water your lawn thoroughly. This helps the sand settle and ensures that the grass begins to grow through the new layer. Continue with regular, deep watering to encourage deep root growth, which is essential for a resilient lawn. Additionally, a follow-up fertilization can provide the necessary nutrients to push the grass through the new layer of sand. Opt for a fertilizer like urea, following the manufacturer’s recommendations for application rates and timing. With proper aftercare, your lawn should recover from the leveling process quickly, emerging more level, healthy, and vibrant than before.
Common Mistakes to Avoid
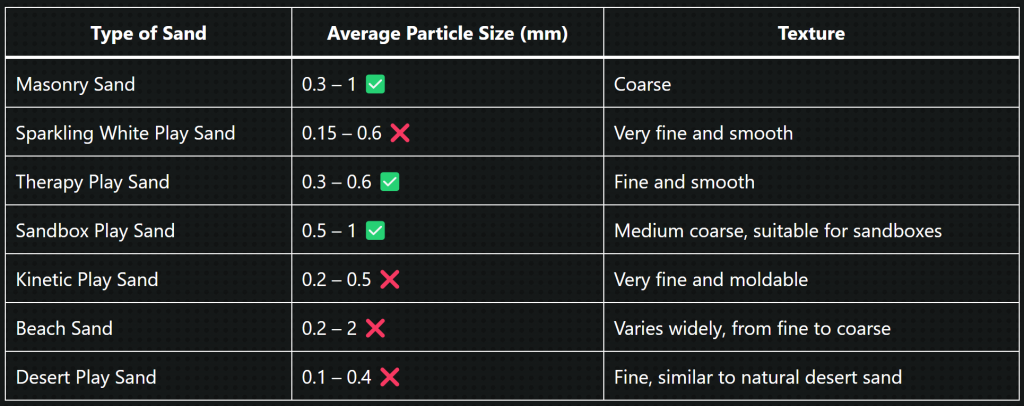
A successful leveling project can significantly enhance the appearance and health of your Bermuda grass lawn, but there are pitfalls to avoid. One of the most common mistakes is applying too much material at once, which can suffocate the grass. Remember, it’s better to level gradually, especially if significant corrections are needed. Another error is choosing the wrong material; while sand is ideal for Bermuda grass, using construction-grade or beach sand, which may contain salts and other contaminants, can harm your lawn. Additionally, neglecting proper preparation, such as mowing and dethatching, can prevent the leveling material from integrating effectively with the soil, reducing its benefits. Finally, inadequate aftercare, especially insufficient watering, can slow down the recovery process and impact the overall health of the lawn. By avoiding these common mistakes, you can ensure that your leveling project is successful and that your Bermuda grass lawn thrives.
FAQs
How much sand do I need for leveling my Bermuda grass lawn?
Use about 1 yard/1 ton of sand per thousand square feet of lawn. Adjust based on the condition and unevenness of your lawn.
What type of sand should I use for leveling?
Uniform sand without pebbles or rocks is ideal to prevent lawn equipment damage. Masonry sand is recommended for its consistency.
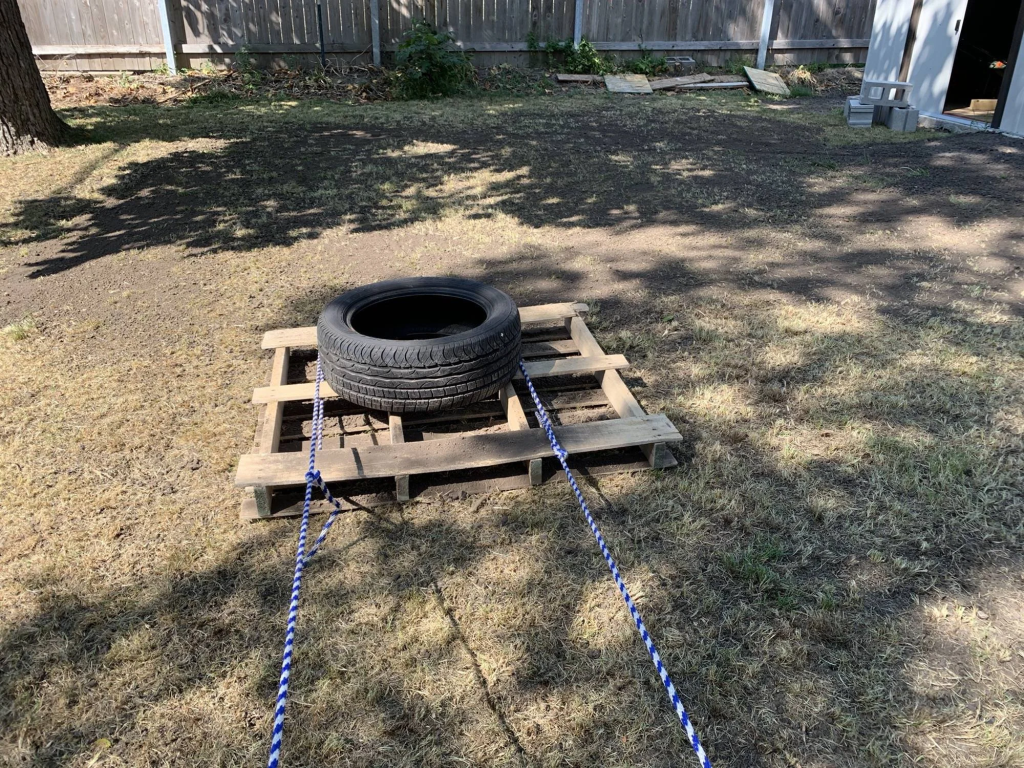
How do I transport and distribute sand over my lawn?
A wheelbarrow or garden cart is effective for transporting sand. For larger lawns, a garden cart attached to a riding mower can simplify and accelerate the process.
How should I initially level the sand on my lawn?
After distributing sand, use a garden or landscape rake to knock down piles and start the leveling process. Aim for an even distribution before the final leveling.
What are some effective methods for dragging the sand?
You can use a steel drag mat or a DIY pallet. The choice depends on lawn size and available equipment. Dragging can be done by hand or with a riding mower for larger areas.
When should I water my lawn after leveling?
Water immediately after leveling to help the sand settle. Additional watering may be necessary for areas that settle more than others, ensuring an even surface.
Is fertilization necessary after leveling?
Applying Urea (46-0-0) or Ammonium Sulfate (21-0-0) after leveling can promote rapid grass recovery through the new sand layer.
What is the expected recovery time for a lawn after leveling?
It typically takes 2-3 weeks for the lawn to fully recover. Grass blades should be just barely showing through the sand to speed up this process.
Is leveling a Bermuda grass lawn a one-time project?
Depending on your lawn’s condition and your goals, leveling might need to be repeated. Even if done once, it can significantly improve your lawn’s smoothness.
Leave a Reply